Light Graffiti

For this project, we had to add ” Light Graffiti” to a person in a picture. To do this, we had to set the camera so the shutter would stay open for however many seconds we needed to make our light design. We had to take all of our photos in the dark, so before we took the pictures, we had to shine the lights on the person while the camera was focusing so the person could be in the picture. Then we did our light design. This process was a challenge but I had a lot of fun doing it. While the shutter was open when we were taking pictures, we couldn’t move or else we would be blurry in the photo. Here are our groups photos;


Here are the rest of our light graffiti photos my group took;

https://photos.app.goo.gl/zzu74rcC6h1Ngdoj1

Light Graffiti

Light Graffiti was arguably my favorite project. We had to use flash lights to light up people in a dark room. The thing that worked well was lighting up the people so you could clearly see them in the dark room. The hardest thing to do was staying still while the people were lighting me up. My Shutter Speed setting was at 8 seconds, not to long, but enough time to create the objects. If you’re trying to take the project to the next level I think you should get more flashlights and glow sticks.


https://photos.app.goo.gl/rLdNwzhCKo01IX7l2

Light Graffiti

https://photos.app.goo.gl/m73rnBnDawGDlTo43


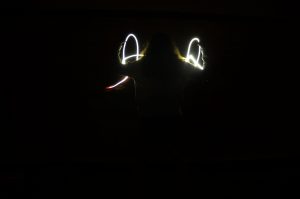
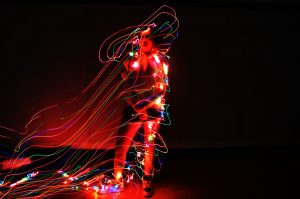
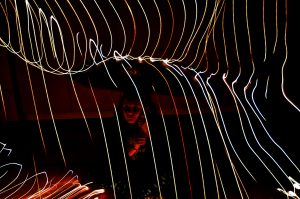
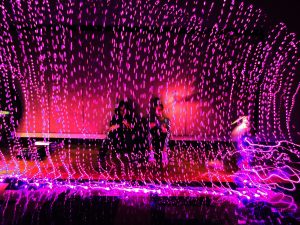
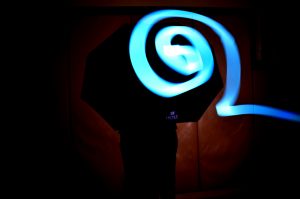
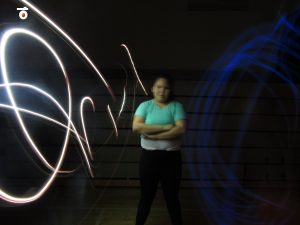
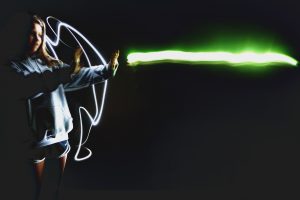
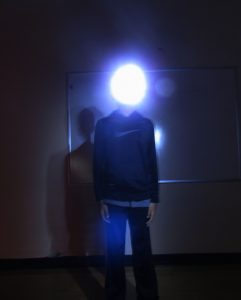
For the past two weeks my group and I had lots of fun working on our light graffiti projects.  Ansh, Jack P., Carter and Me (Jack) were able to create colorful and creative light images.  In order to do this we increases my camera’s shutter speed. The shutter speed variated from picture to picture ranging from 15 to 8 seconds.

The pictures looked good when when the subject was standing still  and 1 or 2 people painted the light.  All of the pictures I have included were created using this methodology.  We tried to incorporate creative ideas that look interest but are not to complicated.

When we tried to have to subject move during the time the shutter was open our product was blury and looked very unprofessional.  We also tried to thow glow sticks away from the camera but not enough light reached the camera to create an image.

I was never frustrated during this project especially since it was so fun. Although it was hard for me to paint the light in some pictures.

In order to make this project even better I think we should be able to use the stage in the all purpose room as the setting of our photographs.  It think the groups should be more spread out between different rooms to avoid light pollution.

This project was such an amusing experience.  light graffiti is a great why to experiment with light.  I will never forget this project and hope to use what I have learned again.

Light Graffiti

During this project we needed to use lights to make light graffiti. The shutter was opened for 15 seconds so that we could make the drawings with the lights. It was hard to make our drawings because we only had 15 seconds to make them. It was easy to come up with ideas and work with my classmates to make our ideas come to life. It was very frustrating to make really good pictures because my group’s “ghost”  were in the picture all the time and we didn’t have enough time to draw creative ideas in only 15 seconds. If we had more time we could make cool creatures and landscapes.

https://photos.app.goo.gl/m1SsPFJaFO2kcSnl2

Light Graffiti

I used a Sony camera to take the photos and used a iPhone 6s or iPhone 7 to use a flashlight.  Something that worked very well was lighting up the person while taking the picture because it made the background really dark. Something that was hard to work with was making sure the light didn’t bounce off the wall because then the picture would look bad and be all messed up. Here is an example of what we did:

https://photos.app.goo.gl/AmsKeNhchawZLKjl1


Light Graffiti

https://photos.app.goo.gl/oPw15SykaZYT60RS2

In this project we were painting with light. We had to isolated our subject by lighting them up in advance while another member of the group drew designs or patterns around them. In this project the shutter speed was extremely important. The shutter speed determined how much time we had to draw around the person and how much light was taken in. After we used Photoshop to edit the curves and make it more visually appealing. Another important aspect to this project was that the subject must stay completely still. If they were to move they may end up with two heads which no one wants.

Light Graffiti

Things that worked were the was plain outlining  and lighting up and drawing light bulbs.  changing to shutter speed and ISO so we could have longer time and more lighting for the background. One thing that did not work was the magic harry potter wand that we used to trace each other. One thing that Frustrated me was when Bryan would point the flashlight at my face .

https://photos.app.goo.gl/qLfUxGd5FBNHrvo22

Light Graffiti

During this project I was very frustrated because the shutter speed was either to long or to short. Just plain outlining them or lighting them up and drawing above them.  While changing the shutter speed and ISO helped adapt the camera to the lighting around and focus on the impotent details. I could have used the timing better or the way that I set the lights in order to help the back round.

https://photos.app.goo.gl/4Uiv56b4PKyRT7oU2

Light Graffiti

This week in class we made light graffiti. We achieved this by making the shutter-speed on our camera longer and moving lights from our phones to make shapes. We used different shutter-speeds for different shots, changing it from five seconds to ten seconds to fifteen seconds, which was the longest our camera could do. In the picture above we had Ansh lay down and not move, while one of us took the lantern that was there and carried around the circle to make a new circle out of light. I edited this picture and my other pictures on Adobe Photoshop to get the most satisfying picture.

The rest of my photos: https://photos.app.goo.gl/9J6bLzzfyNIHGH3C3

Light Graffiti

For this project we made light graffiti. We worked with the shutter speed setting of the camera. We let more or less light in to get different effects. The pictures with shorter shutter speeds were darker and the ones with longer shutter speeds were lighter. We had many difficulties. It was difficult to draw something with light without seeing what you are drawing. We had to use lights with the same brightness so that the picture was legible. Lastly, it was difficult to get the perfect amount of light in the photo. Overall, it was very fun to draw and create with light.

Link to album: https://photos.app.goo.gl/JmkU8CJxQPwlNSBY2