Light Graffiti

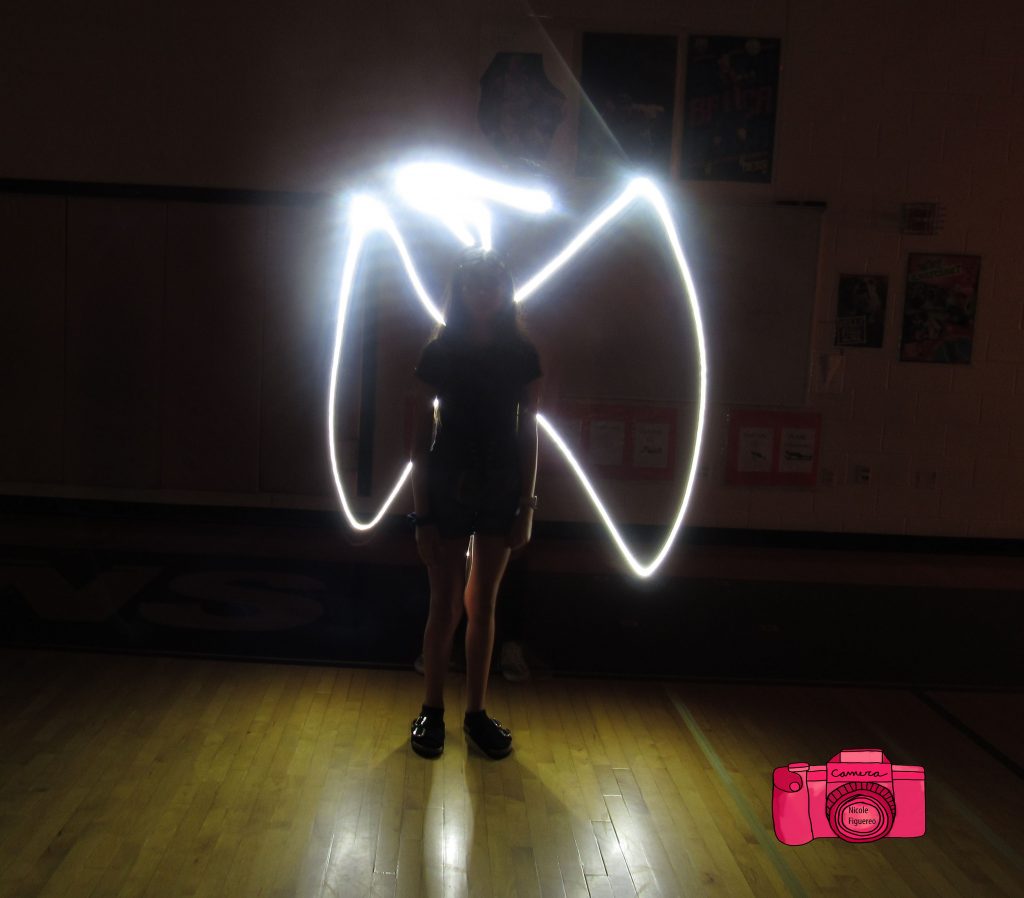
In this project, we took pictures in the school gym with the lights off. We set the ISO to 200 and made the shutter speed 6-15 seconds depending on how big we wanted to draw. If we wanted to draw something big we would set it to 15 seconds. When we wanted to create thinner lines it worked to used the flashlight from the phones. It didn’t work when we tried to draw things in 5 seconds because the time just went by too fast. It was frustrating when we couldn’t see the drawing and we would mess it up or write it backward. A way to step up this project is to make a stack photo out of the light graffiti photos. Click here to view the rest of my photos.

Macro Portraits (Playing W/ Legos)

In this project, we needed to photograph scenes but instead of a person we used legos. The lego was in its own little Lego world and everything in the picture had to make sense with its size. A skill used from previous projects was using photoshop to edit the pictures. A challenging part of this project was making sure nothing in the picture was human-sized. If I had to take 5 more pictures I would like to photograph the legos as if they were running a marathon.

A good night’s sleep.
Leaving the city.
Hiking.
Setting up the tent/fire.
Finished.
Getting ready for bed.

Getting Close

In this project, we needed to take pictures of things up close. A challenge I had was finding objects that wouldn’t look absolutely hideous up close. As well as being patient enough to wait for the camera to focus. If I was able to I would photograph someone getting a tattoo. Below is my favorite image from this project. Click here to view the rest of my photos.

Catch The Action

In this project, we needed to take pictures of something or someone in action. To help capture the images I set the camera Drive Mode to Continuous Shooting. A tip I would recommend anyone taking action photos is to try your best not to move the camera. If I could I would photograph skateboarding because you can get some really cool pictures. Below is one of the photos I took and a stacked one. Click here to see the rest of my photos.

Framing Your Subject

In this project, we needed to find things indoor or outdoor that could frame your subject. In the project of Rule of Thirds, we had to use grid lines that were given to place your subject. In this project, we had to go out and find the frames. A challenge of using this type of composition is finding a “frame” that is big enough to fit the entire subject. The picture below is my favorite picture because I like the way the bike rack framed Aslyn. As well as the way the sunlight put together the entire picture. Click here to view the rest of the photos.

Rule of thirds

Rule of Thirds is when you place everything in a photo on “lines” that help the viewer go from one part of the picture to the other. The “lines” are a group of lines on a camera that divides the image into nine even pieces. What worked was placing the subject wear the lines on the sides meet. What didn’t work was placing the subject directly in the center of the photo. At the beginning of the project, I thought this project would be really easy but then I realized I always center the subject of my photos. Below I put my favorite photo with a person and my favorite without a person. Click here to view the rest.

Infinite background (Black)

During this project, the main goal was to take a picture and make the background look like it disappeared. We made the ISO lower to make the black background even darker. As well as a lamp that someone in each group would hold. A challenge during this project was making sure we had the correct ISO. The easier part of this project was to hold the lamp at the correct angle. Below is a picture of me and a picture I took. Click here to view the rest of the black background portraits.

Infinite Background(White)

During this project, the main goal was to take a picture and make the background look like it disappeared. We made the ISO higher to make the white background even brighter. As well as a lamp that someone in each group would hold. A challenge during this project was making sure we had the correct ISO. The easier part of this project was to hold the lamp at the correct angle. Below is a picture of me and a picture I took. Click here to view the rest of the white background portraits.

1 Object, 5 Shots

During this assignment, we had to pick 3 objects including 1 person. We needed to take pictures of the objects at 5 different angles. The most challenging part was finding an object that can be taken 5 different pictures of and still look good. The hardest object for me to photograph was the purple flower. It was hard for me to photograph because the flowers were only facing in one direction. Making it difficult to get a good looking picture. This project really helped me learn to take pictures at new and better angles. I inserted my favorite photo below. Click here to view the rest.

24 Colors

In this assignment I had a box of 24 crayons. I walked around the school looking for the best color matches for every crayon. The most challenging part of this assignment was finding exact color matches. The easier part of this assignment was finishing the pictures on time because we were provided enough time in class. My favorite picture is the one below. Click here to view the rest.